November 2020
NO BAKE OREO PIE

NO BAKE OREO PIE

 Easy to make no bake oreo pie with oreo crust! Gluten free option available and it’s only 8 ingredients. People LOVE this oreo pie!

The question is.. is there such a thing as too many oreos?

I think not :)

Everyone who had a piece of this no bake oreo pie could not get enough. The only question was “can I have some milk?” not “next time can you make this with less oreos?”

I mean, they are America’s favorite cookie for a reason!


Ingredients

 2 (14.3 oz) packages of oreos - divided, listed in instructions

 1 stick butter, melted

 two, 8 oz packages of cream cheese, softened

 1 cup powdered sugar

 1 tsp vanilla extract

 1 container Cool Whip (8 oz), thawed

 1 & 1/2 cup chocolate chips

 1/2 cup heavy whipping cream

Instructions

OREO CRUST

Process 1 entire package of oreos in a food processor until fine crumbs remain. In a large bowl, combine the crushed oreos with the melted butter. Press this mixture evenly into a 10 inch pie pan. Place in fridge until ready to use.

FILLING

In a large mixing bowl, beat the cream cheese with an electric mixer until well blended. Add the powdered sugar and vanilla extract, beat again.

Chop 12 oreos. Mix in the the chopped oreos and cool whip and stir with a spatula until mixed. Spread this mixture on the crust and place in the freezer for 30 minutes.

CHOCOLATE GANACHE

Place chocolate chips in a medium heat-proof bowl.

In a small pot over low heat, heat the heavy cream until just before boiling.

Pour the heavy cream over the chocolate chips. Allow the mixture to stand for 1-2 minutes.

Use a spatula to stir the mixture until smooth.

Allow the ganache to come to room temperature before adding it to the pie.

TOPPING

Before the chocolate hardens, add oreos to the top. Start by adding the halved oreos around the edges, placing them as close or as far apart as you want. Then add chopped oreos to the center of the pie.

Cover the pie with tinfoil and return to the freezer or fridge for 1-2 hours. Before serving, remove the pie from the freezer and let it sit for a few minutes to make cutting it easier. Cover and freeze or refrigerate any leftovers.

Eclair Ice Box Cake

Eclair Ice Box Cake

 No baking, no fuss, this easy ice box cake is absolutely delicious and just so fun. Rich chocolate topping, fun vanilla custardy center, and graham crackers. It tastes like an eclair in cake form! And is way easier than baking eclairs

You guys I am always looking for super duper easy to make dessert recipes. One of my all time favorite treats is an eclair. My husband used to work at a restaurant that had an onsite pastry chef, and she made the ultimate eclairs. Like so seriously tasty, and light, and creamy that I would gorge myself on them and could eat half a dozen before even realizing I had done it.


Ingredients

Eclair Cake

15-20 Graham Crackers broken in half

1 pkg. vanilla instant pudding 3.4 oz. size

1-1/2 cups 2% milk cold

8 ounces COOL WHIP Whipped Topping thawed

Chocolate Topping

½ cup brown sugar

¼ cup cocoa powder

¼ cup butter

¼ cup milk

1 Tbs vanilla extract

White Chocolate Drizzle

1/2 cup white chocolate chips


Instructions

Eclair Cake

In a large bowl beat the pudding mix with the milk, using a hand mixer.

Let it set up a little, then stir in thawed Cool Whip.

In an 8 x 8 square pan, put a single layer of graham crackers, approximately 10 squares, then top with 1/2 of the pudding cool whip mixture.

Repeat this by adding 10 more graham cracker squares.

Then spread the other half of the pudding mixture over the squares.

Top with remaining 10 graham cracker squares.

Then make chocolate topping (below), cover with topping, and then chill in the refrigerator for 2-3 hours.

Just before serving take white chocolate chips and melt in microwave in 20 second increments, stirring between each. Should take about a minute to melt depending on microwave.

Remove from fridge, and use a spoon to drizzle white chocolate over the top to resemble the top of an eclair.

Cut, serve, and enjoy!

Chocolate Topping

Stir brown sugar and cocoa powder together in a small bowl.

In a medium sized saucepan, over medium heat, add butter and milk, and bring to a slow boil.

Let it boil 3-5 minutes. Stirring occasionally.

Remove from heat and add cocoa and brown sugar mixture.

Return to heat, and whisk until smooth, 2-3 minutes.

Remove from heat. Stir in vanilla.

Set aside to cool for 3-5 minutes.

Pour over Eclair cake and put in fridge to let set up.

Serve and enjoy!

CREAM CHEESE POUND CAKE

CREAM CHEESE POUND CAKE

 This rich, buttery and sweet Cream Cheese Pound Cake is everyone's favorite, as breakfast, afternoon tea or dessert any time of the day. This pound cake recipe is a keeper, bake it today!

I love baking during springtime. There is just something about nice, breezy spring weather and having an afternoon tea party with my favorite cakes and desserts on the patio.

I decided to make cream cheese pound cake loaf from scratch. It was such a great idea, the pound cake turned out extremely delightful and perfect with a cup of coffee or tea.


INGREDIENTS

3 sticks unsalted butter, room temperature (1 1/2 cups or 340 g)

8 oz cream cheese, room temperature (1 bar)

3 cups sugar

6 large eggs

1 teaspoon vanilla extract

3 cups all-purpose flour

2 teaspoons salt

nonstick cooking spray


INSTRUCTIONS

Preheat oven to 350 degrees F. With an electric mixer, beat butter and cream cheese until smooth. Add sugar; beat until light and fluffy, about 5 minutes. Add eggs, one at a time, beating well after each addition. Mix in vanilla. With mixer on low, add flour and salt in two additions, beating until just combined.

Generously coat two 8 1/2-by-4 1/2- by-2 1/2-inch loaf pans (1 1/2 quarts each) with cooking spray; immediately pour in batter (pan will seem full). Tap pans on work surface to eliminate any large air bubbles.

Bake until golden and a toothpick inserted in the centers comes out almost clean, 60 to 75 minutes (if the tops begin to brown too quickly, tent with aluminum foil).

Cool 10 minutes in the pan. Turn out the cakes; cool completely, with top sides up, on a wire rack.

LEMON RICOTTA CAKE

LEMON RICOTTA CAKE

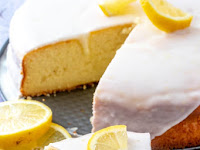
 Moist, flavorful, simple and delicious, this Lemon Ricotta Cake is a tasty citrus cake recipe that you can whip up in one bowl and never have leftovers!

We are lemon fans around here, but let me tell you that this isn’t my first rodeo when it comes to Ricotta Cake. This is one of our absolutely favorite recipes that we now have it in three forms. Lemon, Italian Ricotta Cake and Chocolate Ricotta Cake.


Ingredients

▢15 oz container ricotta cheese

▢4 large eggs

▢2 tsp lemon extract or more depending on your liking

▢1/2 tsp vanilla extract

▢1/2 cup vegetable oil

▢1 box white cake mix

▢3/4 cup heavy cream

Glaze:

▢2 cups powdered sugar

▢3-4 Tbs lemon juice

▢1 Tbs lemon zest

▢1-2 Tbs milk optional


Instructions

Preheat oven to 325.

Spray a 10" springform pan with non-stick cooking spray.

In large bowl beat together with hand mixer your ricotta, eggs, extracts and oil until combined.

Add in your cake mix and beat until just incorporated.

Add in heavy cream mixing until blended in.

Pour into prepared pan and bake for about 60 minutes or until center is set.

Remove from oven and cool in pan for about 5 minutes then remove edges and cool completely.

Once cooled make your glaze by mixing your powdered sugar, lemon juice and lemon zest together in bowl.

Pour over cooled cake.

Cut and serve.

Birthday Present Cake

Birthday Present Cake


Ingredients

Ingredients for cake

Betty Crocker™ Super MoistTM Vanilla Cake Mix, 540g

80g butter, melted

¾ cup (180ml) milk

3 large eggs

To decorate

Betty Crocker™ Creamy Deluxe Vanilla Frosting, 400g

Icing sugar, for dusting

250g red ready to roll icing

100g coloured sugar-coated chocolate buttons

Featured Products

Product 

Super Moist Vanilla Cake Mix

Product 

Creamy Deluxe Vanilla Frosting


Instructions

Preheat the oven to 160°C (140°C fan forced). Grease and line a 20cm square cake tin with baking paper. Make, bake and cool the cake mix as directed on the box.

Trim the rounded tops off the cake (if necessary) and brush off any crumbs. Place cake, cut-side up, on a cake board. Spread with a quarter of the vanilla icing. Chill for 30 minutes, then spread the remaining icing onto the top and sides of the cake leaving a smooth surface. Chill for a further 30 minutes.

On a surface lightly dusted with icing sugar, roll out the red icing to a large 2-3mm thick rectangle. Cut 2 x 2.5cm wide strips from the longest length and place onto the cake, crossing in the middle, for the ribbon. Trim the edges neatly at the base of the cake.

Cut 2 x 24cm long and 2.5cm wide strips from the icing. Using one strip, fold in each end from the outside to the middle to make a bow. Press in the middle to seal and tuck a little kitchen roll or a wooden spoon handle into the loop to keep the shape. Cut a 6cm x 2.5cm piece of icing and wrap around the middle of the bow. Press gently to seal. Cut the second 24cm length of icing in half and cut an inverted V into one end of each. Place onto the cake with the straight end pressed onto the middle of the cake, where the 2 other ribbons cross over.

Place the bow on top and press gently to stick. Set the chocolate beans into the vanilla icing around the cake to decorate. Remove the kitchen roll or wooden spoons from the bow once ready to serve.

Winter Cake

Winter Cake

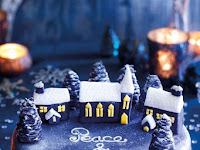
 This Winter Cake is an impressive dessert that everybody will love, perfect for winter holidays, a great twist to the classic recipes. Almond biscuit crust at the bottom with two layers of moist white cake, filled with raspberry and red currants filling and topped with a delicious sweetened condensed milk buttercream. Beautifully decorated with fresh rosemary, fresh raspberries and red currants, cinnamon sticks and dusted with powdered sugar to get you into the holiday spirit. I found the effect of painting the sides of the cake with a bit of red being really amazing, hope you'll try it too.

I really loved the cake as it is very well balanced, the sweetness of the buttercream and cake layers is very well balanced by the tart raspberry and currant filling, while the almond biscuit which brings a crispy texture complements so well the soft and tender cake layers. So simple, so beautiful, definitely a must-try recipe. Enjoy and Happy Winter Holidays everyone!


Ingredients

Makes about 14-16 servings

Almond Biscuit

1/4 cup (55g) butter, chilled, cut into small pieces

1/2 cup (50g) ground almonds

1 tbsp (15g) sugar

1/2 cup (60g) all-purpose flour

1/4 tsp (1g) salt

1 tbsp (15ml) ice cold water

White Cake Layers

2 1/3 cups (290g) cake flour

3 tsp (12g) baking powder

3/4 tsp (3g) salt

1 1/2 tsp (7g) almond extract

1 1/4 cup (250g) sugar, divided

3/4 cup (170g) unsalted butter, at room temperature

1 cup (240ml) whole milk

5 large eggs whites (150g)

Raspberry and Red Currant Filling

5 oz (140g) fresh or frozen raspberries

2 oz (60g) fresh or frozen red currants

1/4 cup (50g) sugar

1 tbsp (15ml) lemon juice

Sweetened Condensed Milk Buttercream

1 1/3 cup (300g) unsalted butter, at room temperature

1 can (14 oz-397g) sweetened condensed milk

1 tsp (5g) vanilla extract

For decoration

fresh raspberries

fresh red currants

cinnamon sticks

fresh rosemary

powdered sugar

red gel food coloring

Directions

Prepare almond biscuit dough.  In a large bowl combine flour with sugar, almonds and salt. Incorporate chilled butter to the flour mixture, using a pastry blender, a fork or a pastry processor, until crumbs are formed. Add water and stir until incorporated. Wrap it with plastic, shape into a disc and refrigerate for at least 30 minutes.Roll the dough between two pieces of parchment paper or plastic wrap until it's about 8 1/2 inch (21cm) in diameter.Use a 8 inch (20 cm) ring to cut a circle. Remove the excess dough.  Refrigerate the dough for about 30 minutes before baking.Preheat oven to 350F (180C).Prick the circle of dough with a fork and bake for 15 minutes. Allow to cool completely.Prepare white cake layers. Grease and line with parchment paper two 8 inch (20cm) pans.In a medium bowl, combine flour, baking powder, and salt, and stir to combine.In a large bowl mix butter with ¾ cup (150g) sugar until smooth. Add almond extract and mix to combine. With the mixer on low, alternate adding gradually milk and flour mixture until all is well incorporated.In a separate bowl whip egg whites until foamy. Gradually add ½ cup (100g) sugar and continue whipping until stiff peaks form.Gently incorporate whipped whites into the butter mixture.Divide batter evenly into the prepared pans.Bake at 350F (180C) for 20-25 minutes until a toothpick inserted into the center of the cake comes with few moist crumbs attached.  Make sure you don’t overbake.Cool completely.Meanwhile prepare the raspberry filling. Place raspberries,red currants,  sugar and lemon juice into a saucepan and bring to a boil while stirring constantly. Simmer for about 10 minutes or until thickens. Remove from heat, sieve to remove seeds and set aside to cool until ready to use.Prepare sweetened condensed buttermilk. Both butter and sweetened condensed milk need to be at room temperature before preparing the frosting.In a large bowl mix butter until light and fluffy, for about 5-7 minutes.Incorporate vanilla extract.  Gradually add sweetened condensed milk in thirds, mixing after each addition. Once incorporated the buttercream is ready to use.Assemble the cake. Place the cooled biscuit onto a serving platter. Spread a bit of buttercream frosting. Top with one white cake layer. Add raspberry filling into the middle. Pipe a border of buttercream on top and spread the raspberry filling inside. Top with the second white cake layer. Spread a thin layer of buttercream on top and sides. Refrigerate for 30 minutes. Cover with buttercream to create smooth and even edges.Refrigerate for at least 1 hour to set.Decorate the cake. Place a bit of red gel food coloring into a small recipient. Use a brush to paint the bottom side of the cake.Use a small plain tip to pipe some remaining frosting around the bottom of the cake.Decorate the top with fresh red currants, raspberries, cinnamon sticks and fresh rosemary. Dust with powdered sugar for great snowy effect. Enjoy!